Nav Display Descent Planning
aviationtechniquesDescent planning made easier with the navigation display.
Overview #
Early on in jet training, instructors teach pilots how to plan a descent from their cruising altitude. Most commonly, they teach a technique called three times your altitude to lose. This post explains that technique and describes a way to apply it using the navigation display (ND) found in modern aircraft.
The Problem #
Jet aircraft fly at high altitudes for efficiency. In long range flight, jet engines burn less fuel at higher altitudes than at lower altitudes. However, when it comes time to land, pilots must decide how far from the field they should begin their descent. It's important to choose the correct distance.
If the pilot begins the descent too early, the aircraft burns excess fuel. However, if they begin it too late, the aircraft will have excess energy and having too much energy can result in an unstable approach. Therefore, jet instructors place emphasis on descent planning early in training.
The Technique #
To estimate a 3° idle path descent, instructors teach students to multiply altitude to lose in thousands of feet and multiply by 3.
Descent to Field Example: #
- Cruise altitude: 35,000 (FL350)
- Airfield altitude: 1,000
- Altitude to lose: 34,000 (35,000 - 1,000)
- Distance from field to start down: 102 ((34000/1000) * 3)
Descent to Restriction Example: #
- Cruise altitude: 35,000
- Restriction altitude: 20,000
- Altitude to lose: 15,000
- Distance from field to start down: 45
To increase the accuracy of this technique, it's common to ±1 NM for every 10 KT of tailwind (+) or headwind (-).
Technique Using a Navigation Display #
We can use the range rings on modern navigation displays to make this math a little easier. Range rings allow you to work the math backwards using your current distance to calculate if you're above or below the 3° idle path descent.
Steps #
- Drop 3 zeros from restriction altitude.
- Drop 1 zero from range. Multiply it by 3.
- Add Step 1 + Step 2 - this is your ideal altitude
- Drop 3 zeros from current altitude.
- Compare step 3 (ideal altitude) and step 4 (current altitude).
- Ideal < current = above path. Start down.
- Ideal > current = below path. Descent can wait.
I know, this sounds way more complicated. However, think of it as visual process. It will become second nature with practice. Here are some examples.
Note: The examples below use crossing restrictions. This technique also works to determine an ideal descent to a runway. To do so, replace the crossing restriction with airfield elevation rounded to the nearest thousand.
Descent to Restriction Example: #

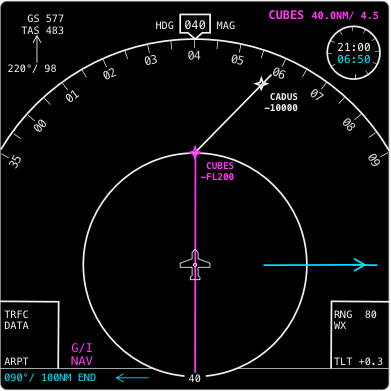
Referencing the nav display above, note that CUBES is sitting on the 40 NM range ring. You're at 35,000 feet.
- Drop 3 zeros from restriction altitude (20,000). 20
- Drop 1 zero from range (40). Multiply by 3. 12
- Add Step 1 (20) + Step 2 (12). 32
- Drop 3 zeros from current altitude (35,000). 35
- Compare step 3 (32) and step 4 (35).
- 32 < 35 = above path.
- The difference is 3,000', so we probably don't need drag.
Descent to Restriction Example 2: #

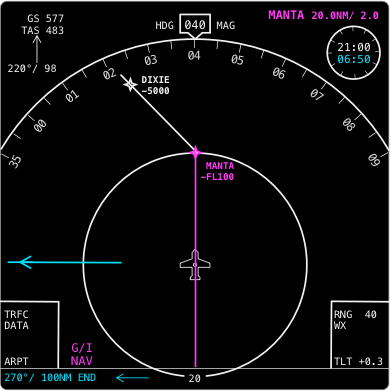
Referencing the nav display above, note that MANTA is sitting on the 20 NM range ring. You're at 15,000 feet.
- Drop 3 zeros from restriction altitude. 10
- Drop 1 zero from range. Multiply by 3. 6
- Add Step 1 + Step 2. 16
- Drop 3 zeros from current altitude. 15
- Compare step 3 and step 4.
- 16 > 15 = below path.
- The difference is 1,000', we should start down now.
Conclusion #
Like any technique, you need to practice it often to learn it. Also like any technique, if you don't like it, then don't force it--there are others out there. Thanks for reading, fly safe.
- Next: Mainz, RP (DE) (EDDF)
- Previous: Jepp Tips 1 - Pubs Search